
Review: Hornady 190-Grain Sub-X Ammunition and Bullets for 300 AAC Blackout
This is a review that focuses on the overall performance and comparison of factory versus handloaded ammo. Specifically, I used the Hornady 190-grain, Sub-X ammunition and bullets for my .300 AAC Blackout rifles.
I own several guns in .300 AAC Blackout caliber, and only one is not based on an AR semi-automatic action. It’s a Ruger American Ranch rifle, a bolt-action with a short, threaded barrel. I bought it purposely for varmint hunting, and chose the gun and the caliber so I could make the system as quiet as possible when pairing it with a suppressor.
For a while, I had to contend with having only non-expanding bullets available for my .300 hunting ammo, whether in factory ammo or for my handloads, because I wanted subsonic ammunition. This would eliminate the supersonic “crack” noises from the bullets as they traveled downrange, trailing their sonic shock waves along behind them. Achieving subsonic speed, along with good terminal performance, typically means using a big, heavy, but streamlined bullet.
Unfortunately, those streamlined projectiles do not expand at subsonic striking velocities, as they were designed for centerfire rifle ammo. They have good terminal performance at high striking velocities, but poor expansion in animals at the slow projectile speeds I want in my system. I did a lot of .300 cartridge reloading with different projectiles in the 190 to 220 grain range, trying to get a good combination of powder load, projectile weight and shape that would be subsonic at the gun’s muzzle, accurate and have good terminal performance. Alas, all I was able to achieve was a bunch of .30 caliber holes through and through the targets. Ditto with factory ammo.
Hornady 190-Grain Sub-X Ammunition and Bullets for 300 AAC Blackout
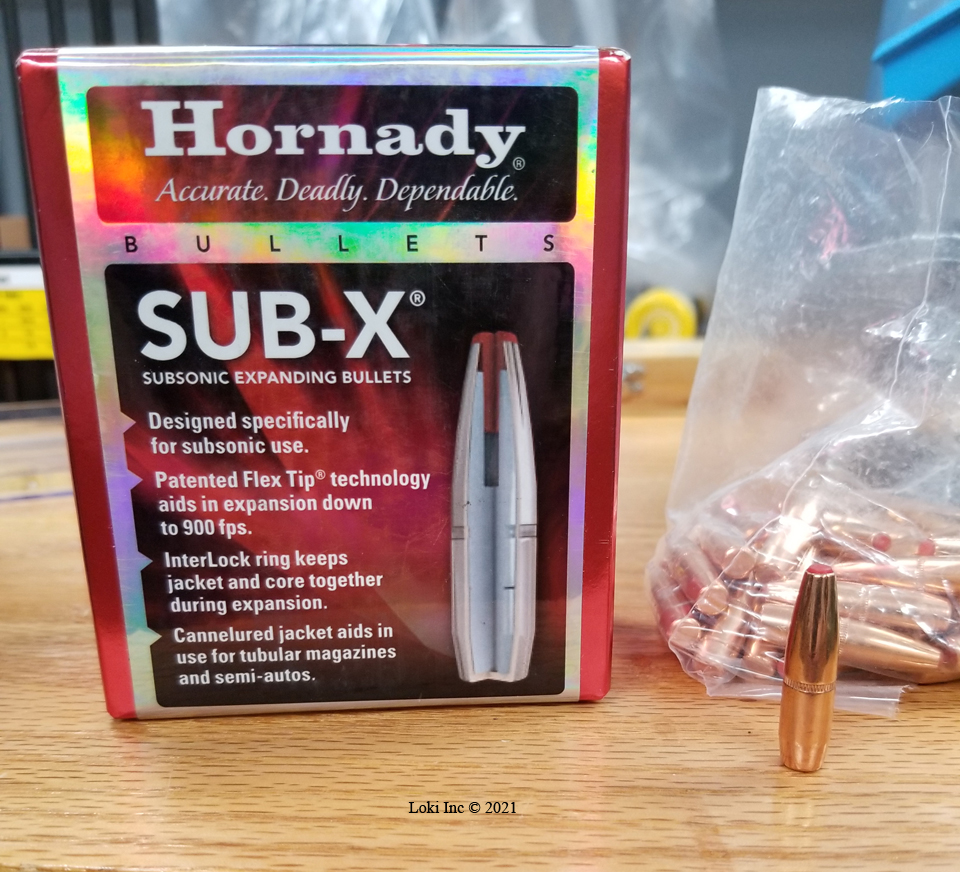
In a happy coincidence, at about the time I was ready to give up and accept poor terminal effects, Hornady Ammunition released its 30 cal .308 190 grain Sub-X® bullets to the handloading community.
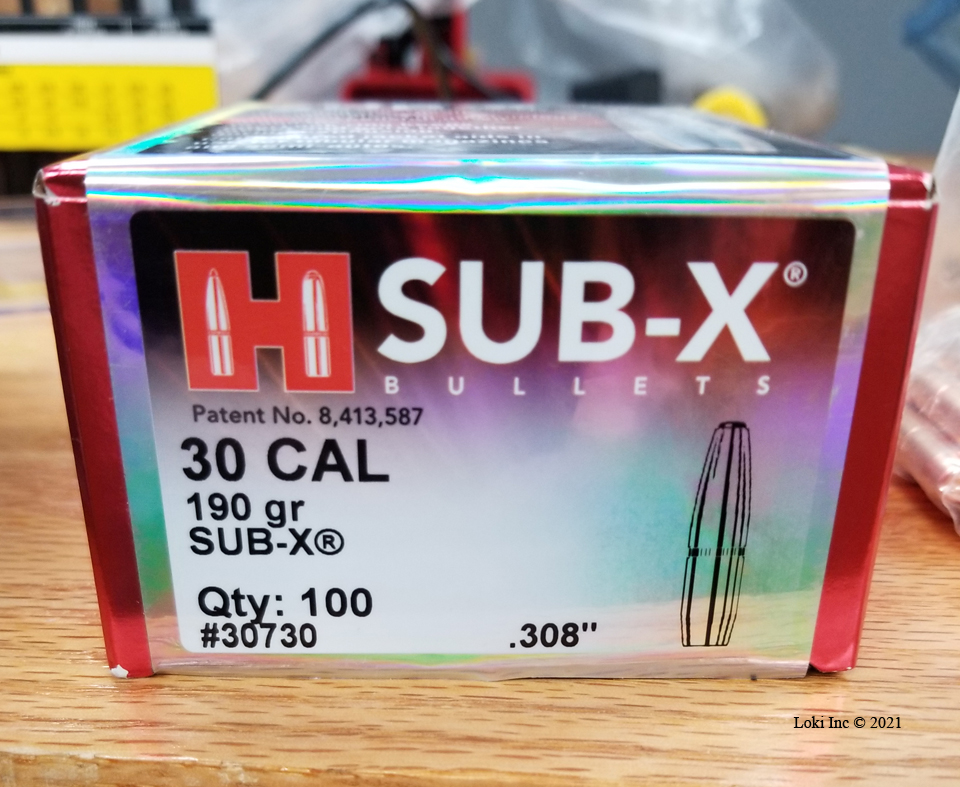
Hornady Sub-X® bullets details
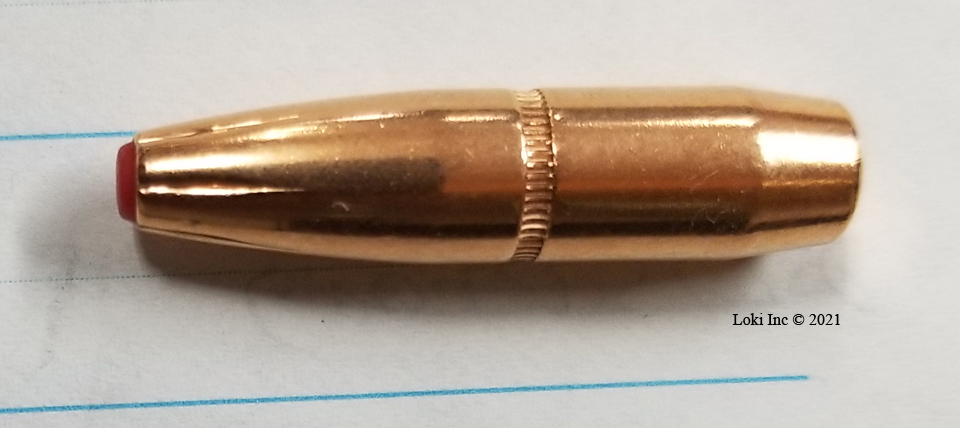
Hornady Sub-X®bullet
Hornady advertised that the bullet design was optimized for ballistic performance at subsonic velocities, as well as reliable expansion in an animal target. Soon afterwards, Hornady introduced rifle ammo using the same bullet, the 300 Blackout 190 grain Sub-X® Subsonic.
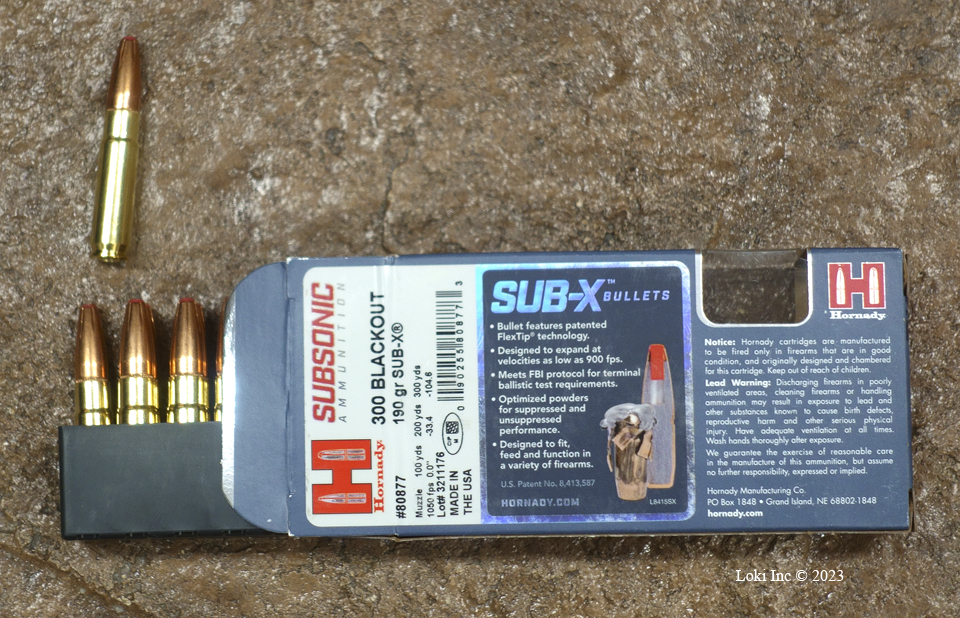
Hornady Sub-X® 300 Blackout factory ammo
First, I acquired enough Sub-X® bullets to run handloads for load development, and then for testing on varmints. I had finished my load development and was busy busting armadillos and raccoons with the ammo when Hornady released the factory loads. So, I acquired a couple of boxes of the loaded Sub-X® rounds for comparison to my handloads.
The Reloading Process
For my handloads, I had difficulty finding new cases so I used 100 demilitarized, once-fired, FC 15 5.56 x 45 mm NATO caliber cases, cut-down and re-formed into .300 AAC/Blackout cases (7.62 x 35 mm). Because they were “remanufactured” cases, I checked a small sample for their maximum trim length to be no more 1.368 inches and they were okay. I then checked the neck dimensions (outside diameter no more than 0.3340 inches, and thickness no more than 0.013 inches) and as I suspected, about half were not OK.
Why did I check the necks?
Experience with remanufactured .300 cases made me alert to over-thick case necks. Because the cases are made from 5.56 cases, and are shorter than the parent cases, the resulting neck metal comes from the parent case body instead of its neck. Case bodies, particularly military case bodies, tend to be thicker than the necks. Over-thick necks on .300 cases can cause them to jam during feeding or extraction, and can lead to higher chamber pressures than intended.
Not having a neck trimming tool that would work on the .300 cases, I used my mini lathe to thin the necks of the offending cases. Next, I lubed the cases then decapped and sized them with the full-length sizing die from my Lee die set – three times through the sizing die, rotating the case 90 degrees after the first time through.
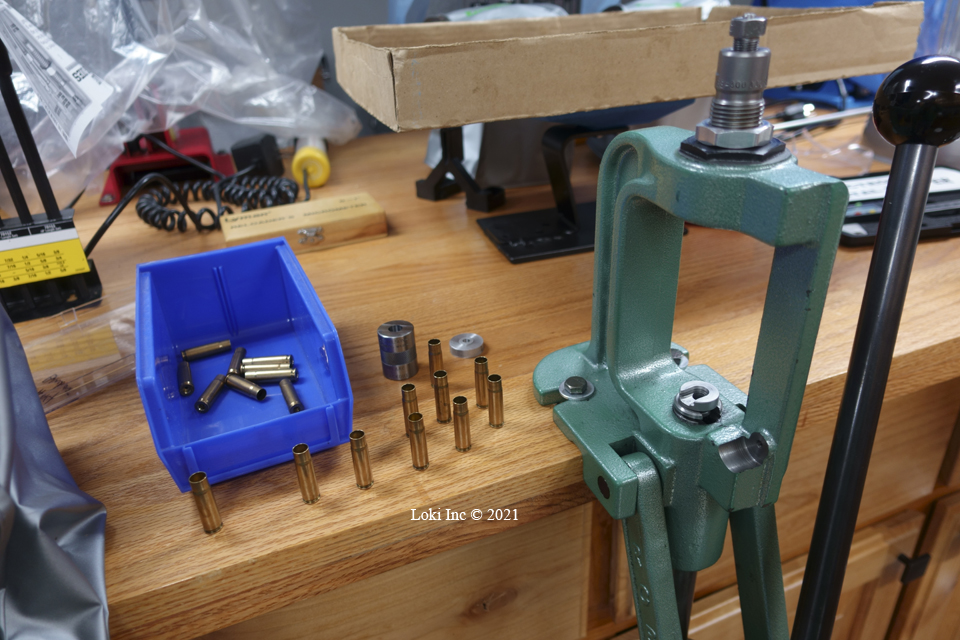
Resizing .300 AAC Blackout cases
I reamed the case primer pockets and cut the primer crimps (they were former military cases, so the primers were crimped) with a Hornady Small Head Primer Pocket Reamer chucked in a hand-held drill. I then deburred the case mouth of each case, inside and outside, with an RCBS Deburring tool.
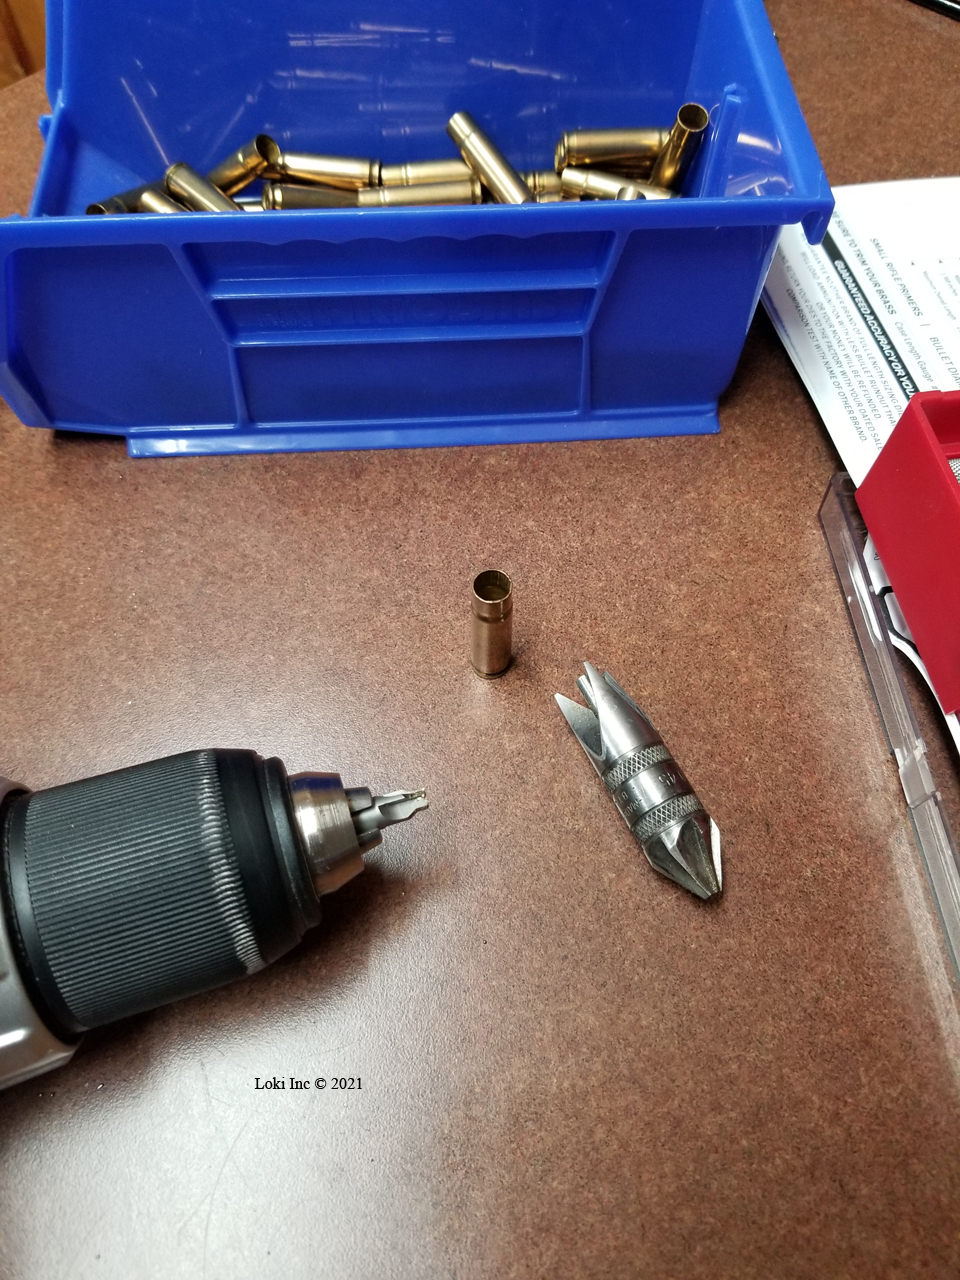
Trimming sized cases
I also used a Lyman Flash Hole Uniformer to remove the small burrs from the primer flash holes created when the holes were punched during case manufacture. The uniformer also cuts those holes to a consistent size and shape, as long as they are close to the center of the primer pocket. If they aren’t, the tool will let you know by its feel that it is trying to center the holes. Check those cases, and throw them out if the holes are off-center.
Cases with problem primer flash holes
I primed the cases with Remington #6 ½ Small Rifle Primers, then dropped powder into them Since Remington primers are no longer for sale, any good quality standard small rifle primer will work as a substitute. I loaded five cases, each, with 9.6 grains of H110, and five cases, each, with 11.0 grains of AA1680.
Lastly, I seated each bullet to center of its cannelure (corresponding to an overall length of 2.050 inches), and used the Lee factory crimp die to put a medium crimp on each case mouth.
Seating 190 grain Sub-X®bullet in .300 AAC Blackout case
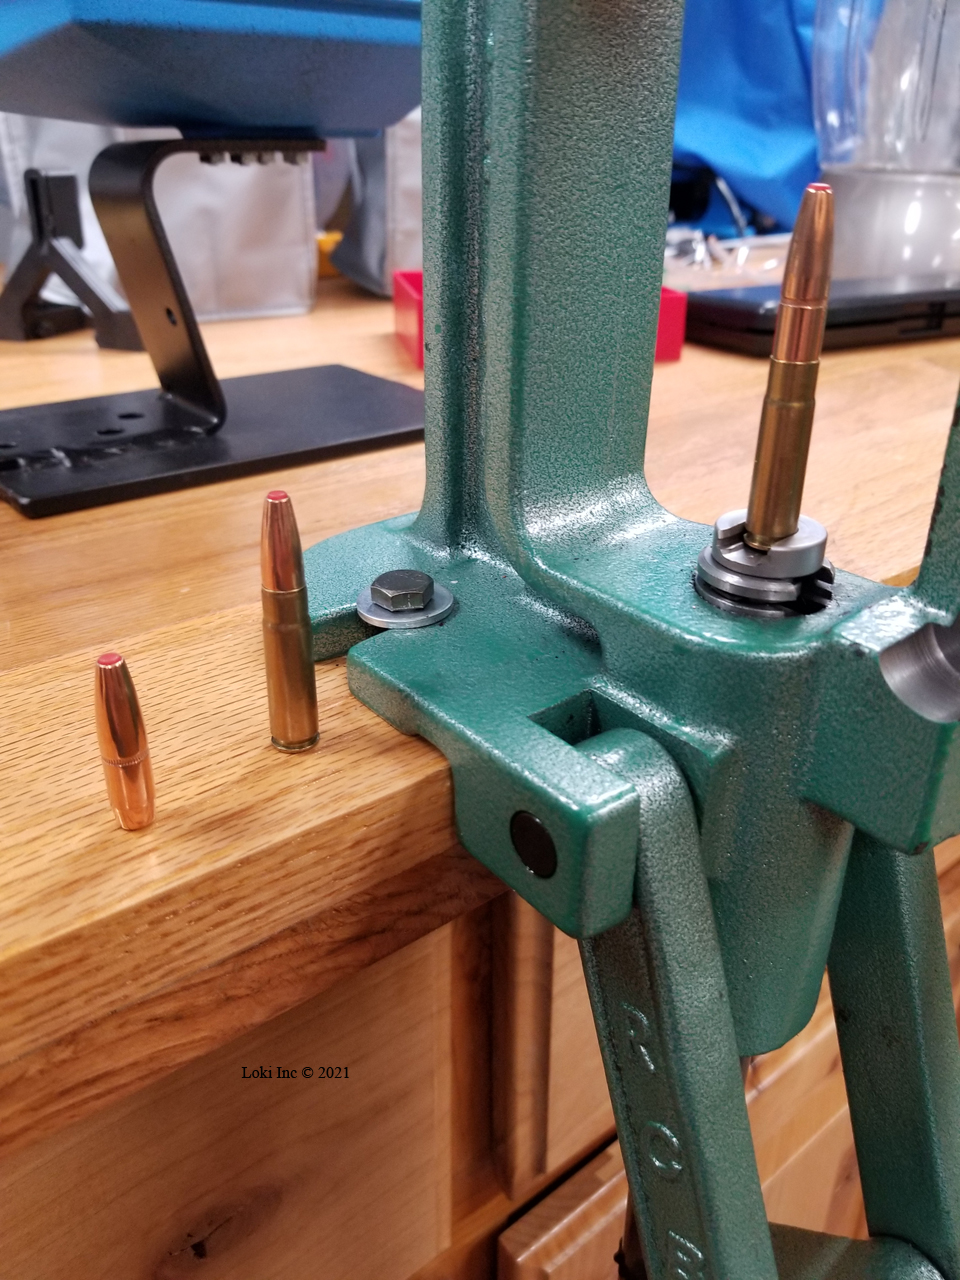
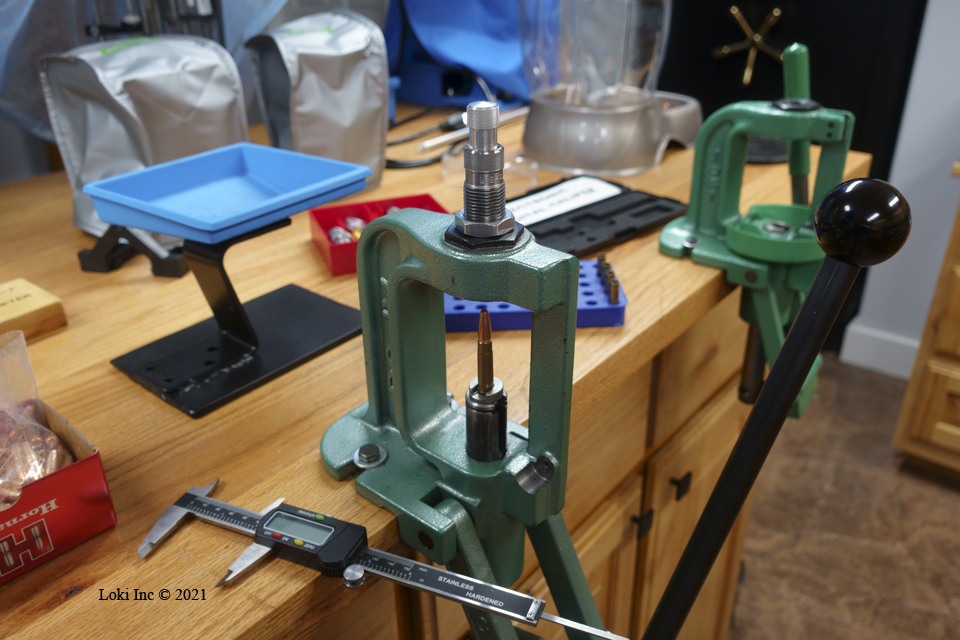
Loading press with bullet to be seated, bullet, and completed round
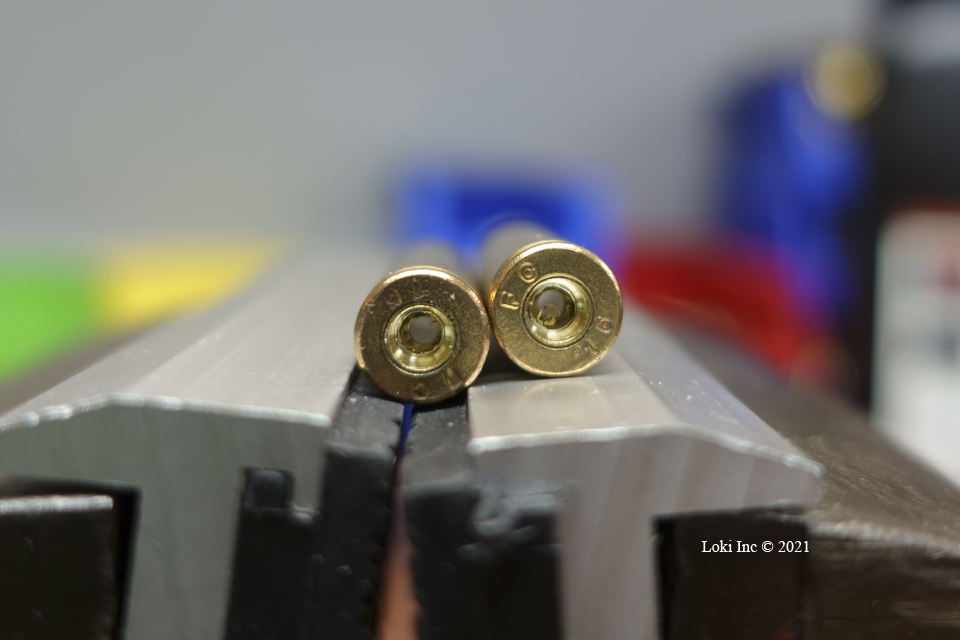
At this point, I double-checked the case necks to make sure each was less than 0.3340 inches in diameter so they would feed and perform correctly in my rifle. They were all okay [photo – Finished .300 AAC Blackout round with 190 grain Sub-X® bullet].
Range Testing
I test-fired the loaded rounds at a 50-yard target across a Magnetospeed chronograph; the average temperature was 63.5F [photos – Magnetospeed chrono mounted on Ruger American rifle, Ruger American rifle with Magnetospeed chrono ready to test .300 AAC Blackout handloads]. My projectile velocity goal was slightly less than the speed of sound, which, for my location and the temperature was about 1120 feet per second (fps).
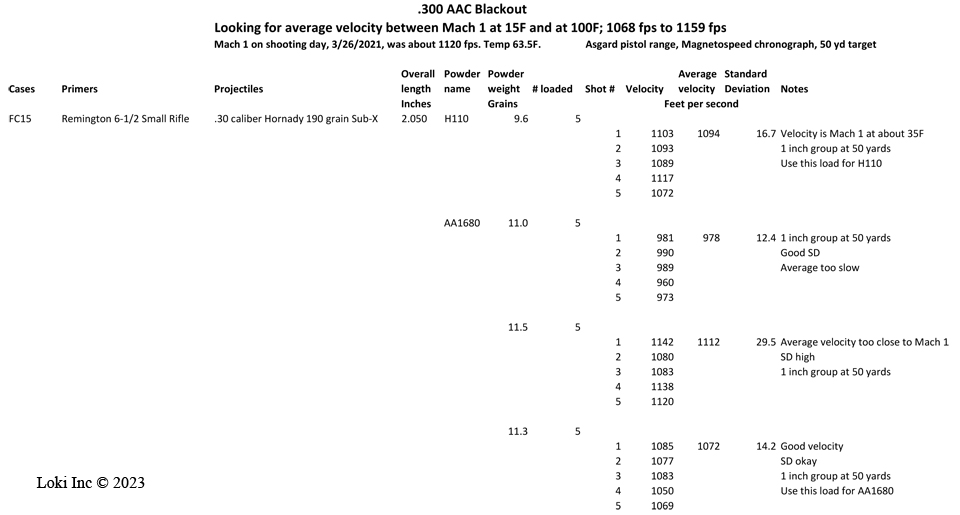
Shooting data Hornady 190 grain Sub-X
The H110 shots averaged 1094 fps, with a Standard Deviation (SD) of 16.7 fps, so I stayed with this load. The AA1680 shots averaged 978 fps, with an SD of 12.4 fps; this average velocity was too slow, so I decided to adjust the load. Even though I wasn’t particularly focused at this stage on group size, each load I shot produced groups of less than an inch at 50 yards. This is sufficient for shooting medium-sized varmints such as armadillos or raccoons under the conditions where I hunt them (dense woods and overgrown fields).
Because of the shooting tests, I loaded five more cases the same way as before, except for using 11.5 grains of AA1680.
Shooting Tests
I fired them under the same conditions (one advantage of having a range right outside your loading area door is that you can quickly go back and forth between the loading bench and the range), and their average velocity was 1112 fps, with an SD of 29.5 fps; the average was too fast, and the SD was higher than I like.
Therefore, I loaded five more cases the same way as before, except for using 11.3 grains of AA1680.
Once again, I fired them under the same conditions, and their average velocity was 1072 fps with a SD of 14.2 fps, so I stayed with this load. The group size of this load was also under an inch at 50 yards.
Based on this shooting data, and the fact that 11.3 grains of AA1680 more completely fills the case volume than 9.6 grains of H110, I loaded 50 rounds using 11.3 grains of AA1680 in the same manner as before to use for varmint hunting. Now, it was time for comparison testing of my handloads and the factory ammo.
Field Testing
I live in a target-rich environment when it comes to varmints, and was able to try each type of .300 AAC Blackout ammunition, factory and handloaded, against several 10s of these creatures.
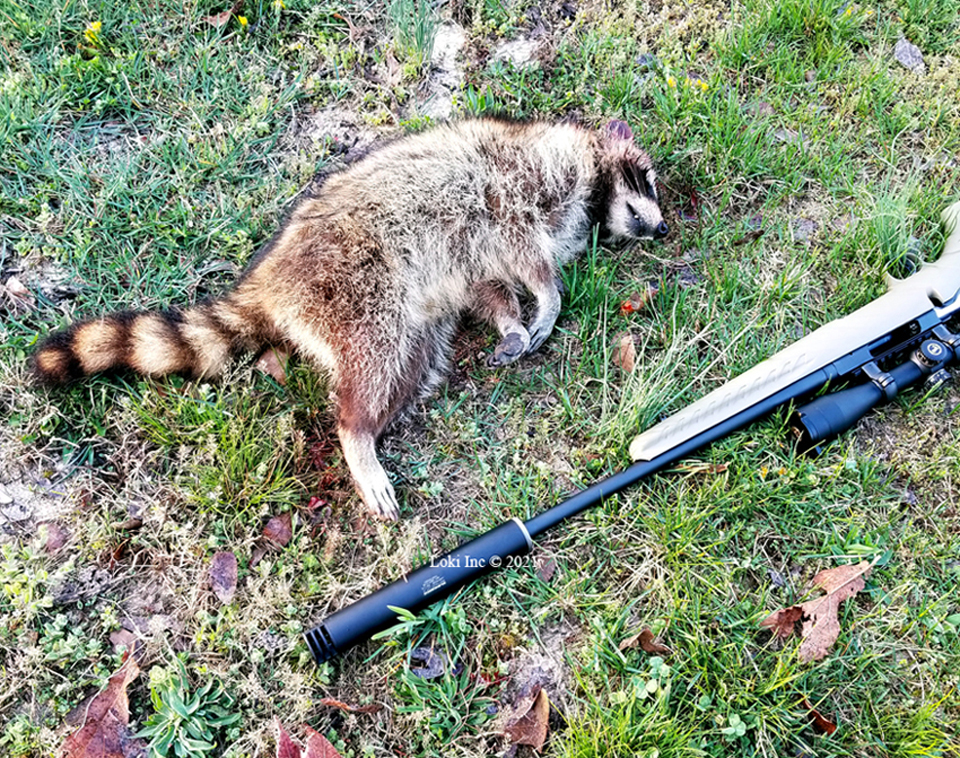
190 grain Sub-X®handload vs coon
After shooting armadillos, coons, possums, and skunks, I could tell no differences between the performances of factory ammunition versus my handloaded ammo. I was able to achieve one-shot kills in most cases, with no failures on the part of the projectiles.

Entrance wound 190 grain Sub-X® factory ammo
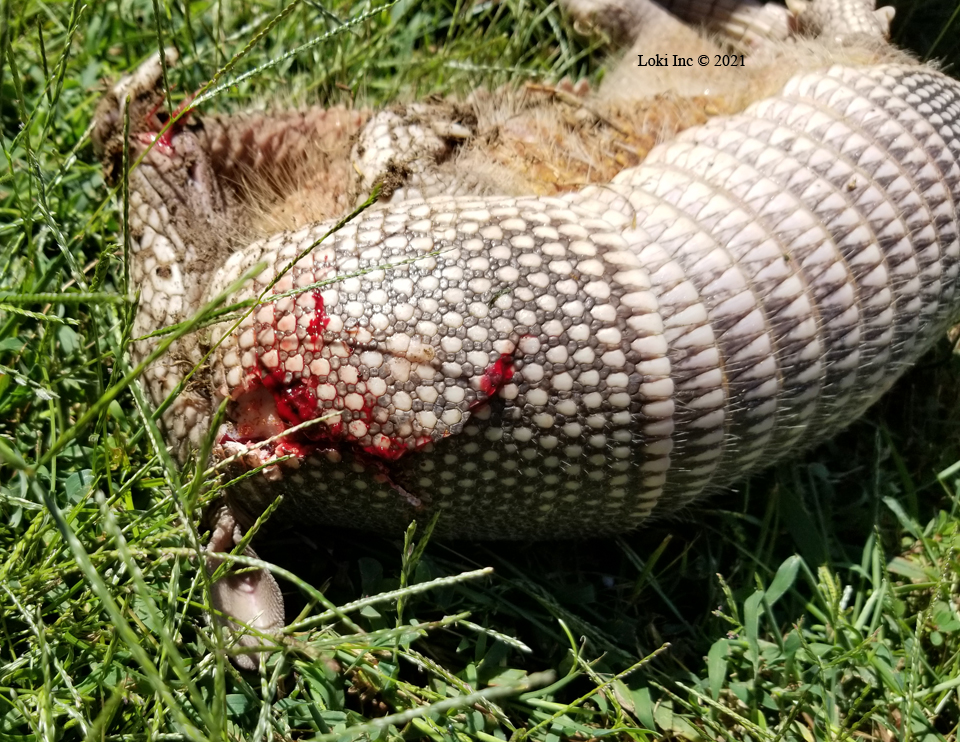
Exit wound 190 grain Sub-X® factory ammo
The “nut behind the butt” was responsible for any kills that required more than one shot. In several instances, the projectiles didn’t exit the varmint; where bullets did exit and I was able to recover them, they showed good expansion and mass retention.

Recovered Sub-X® 300 AAC Blackout bullet
Conclusion
Hornady’s new Sub-X® ammunition and bullets for handloading fit perfectly into my .300 AAC Blackout concept – arming my quiet, suppressed bolt-action rifle with cartridges capable of accurately launching subsonic projectiles that expanded reliably on impact.
Visit Hornady online to see more about this ammunition and bullets.
Review: Mantis BlackbeardX Training System
You may have heard of one of the Mantis products, such as the Mantis X or the X10 Elite training systems, but Mantis recently released an upgrade to their Blackbeard AR-15 training system that combines the functionality of the Mantis X with the Blackbeard – hence, the BlackbeardX.

Front of Blackbeard X package
In a nutshell, the Mantis BlackbeardX allows you, as an AR-15 gun owner, to practice shooting indoors with instant feedback on how well you are doing. The original Blackbeard replaced your AR (rifle or pistol) system’s bolt carrier group (BCG) and charging handle with a single part that allowed dry fire without charging (pulling back the charging handle, sliding it forward to engage, then releasing the bolt) or changing the trigger weight or feel. The system’s rechargeable battery pack resembled a 30-round magazine, and installed in the magazine well the same as a real magazine. The new BlackbeardX retains the functionality and appearance of the Blackbeard, but adds a laser-aiming spot and the Mantis X training system for immediate shot feedback. That feedback is from the laser spot on your target with each of your trigger pulls, and through the Mantis X system app on your portable device (cell phone, etc.). A fantastic feature of the original Blackbeard that is retained in the X version is that you don’t have to charge the gun after every trigger pull – the system automatically re-cocks the hammer after each shot!
Of course, if you had the Mantis X, you could have attached it to the forend of your AR to take advantage of that mobile device application-driven training system for live fire training, as well as dry fire training. You would have had to recharge the gun between shots during dry fire, however, and you wouldn’t have the laser spot for shot feedback (or to use with the Mantis Laser Academy).
Mantis Blackbeard X Training System
What Mantis has done with the BlackbeardX is bring similar convenience and capability to your long gun as they created for your guns through the Mantis X10 Elite system. See my review of the X10 Elite for the details of how it opens a new world of shooting training to a user, without the expense of ammunition and trips to the range. The major difference between the BlackbeardX and X10 Elite systems is the Blackbeard system, as detailed above, replaces the bolt carrier group and charging handle of the AR-type firearm, whereas the X10 Elite mounts externally to the gun. Therefore, you can use the X10 Elite for dry fire as well as live fire, but the Blackbeard is for dry fire only. Of course, when you get ready for live-fire drills, replace the BlackbeardX with your BCG and charging handle, mount an X10 to your AR and head to the range.
Blackbeard X system travel case
The BlackbeardX is packaged in what I call a travel case, as it is robust, zippered and compartmented. Inside the case, the “magazine” and charging handle/BCG device have their own separate cutouts in the foam lining, with the quick start sheet and laser academy information residing in an enclosure in the case “lid” along with the USB cable for charging the battery.
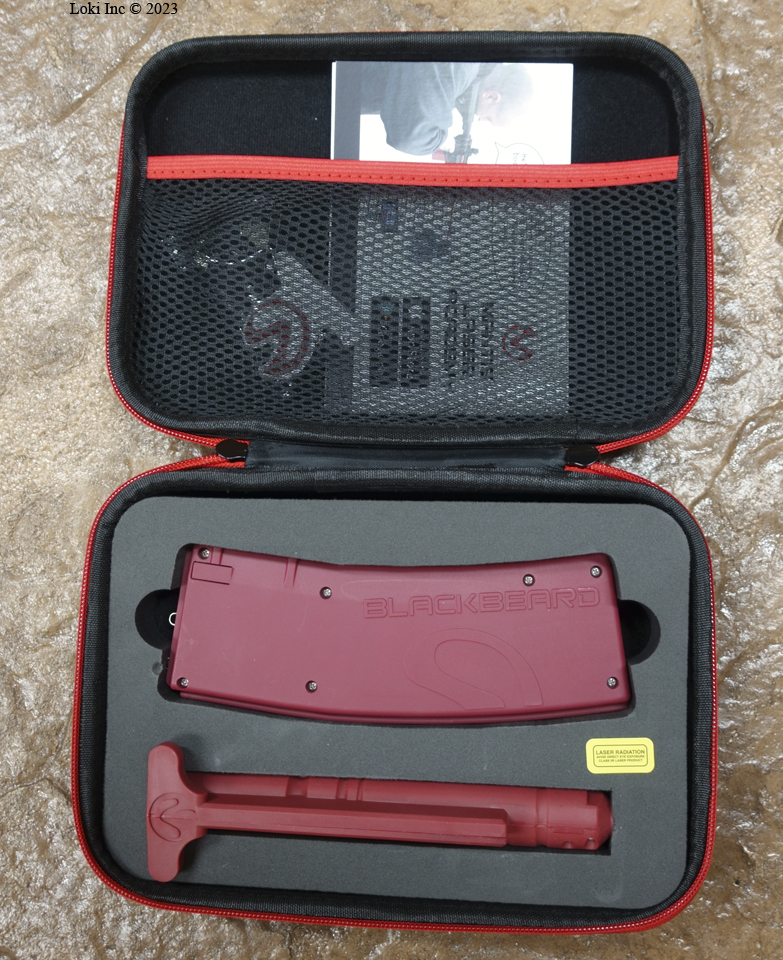
Blackbeard X system in travel case
The system battery and Bluetooth components are in the magazine; it is a good idea to charge the batteries before using the system the first time.
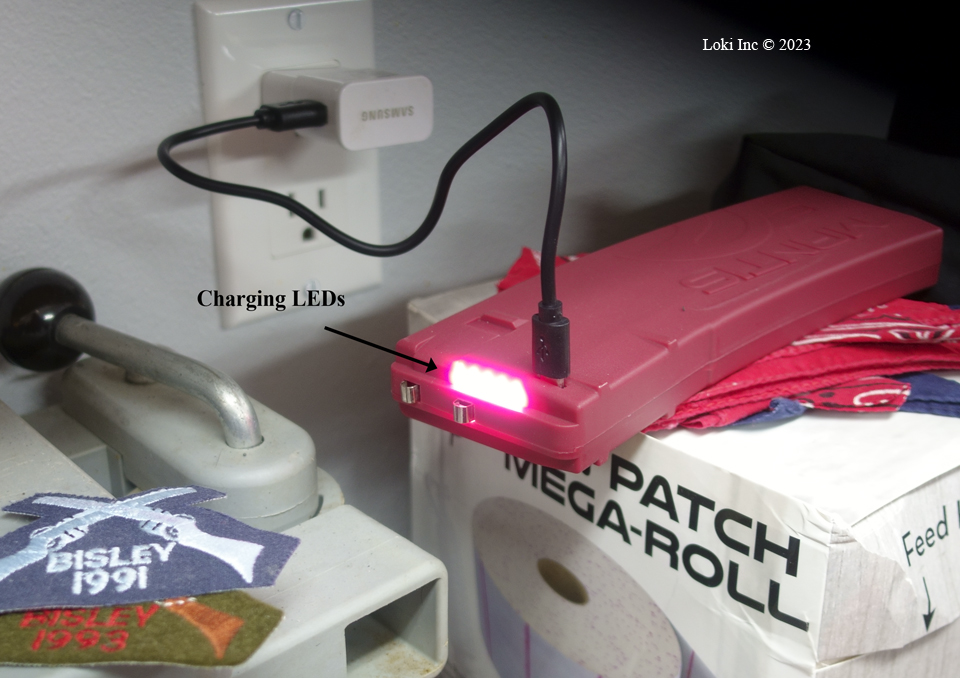
Blackbeard X battery pack charging
The batteries in the BlackbeardX I received were nearly dead, and required a bit of time to recharge as indicated by a series of lights across the top of the magazine. The more lights that are illuminated, the closer the pack is to a full charge. While you are waiting for the battery pack to charge, you can get your AR ready and install the charging handle/BCG device into it.
Colt AR ready for Blackbeard X
I chose to use a Colt Sporter AR-15 as my rifle for this review, but the system should fit into any AR-15 pattern firearm, rifle or pistol.
Installing the Mantis BlackbeardX
Double-check that the gun is clear, with no ammunition in your work area. You won’t need a magazine, of course. After clearing the weapon, use the correct procedure to remove the charging handle and BCG – pull back on the charging handle, cocking the gun, and then lock the charging handle in the forward position. Release the bolt to go forward into battery, but do not pull the trigger because the hammer needs to be in the rear, cocked, position prior to removing the takedown pin or pins.
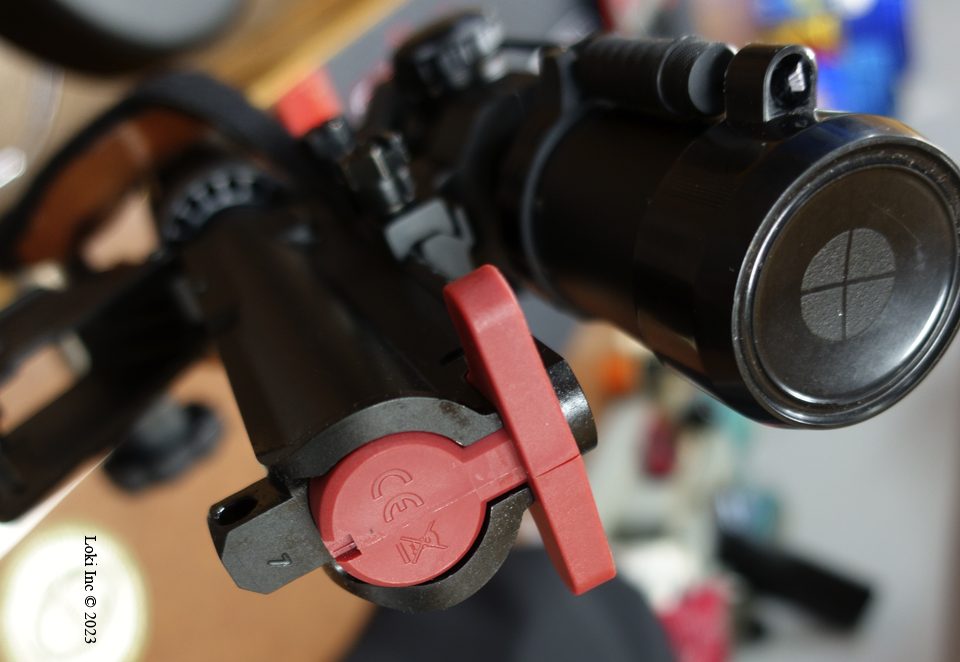
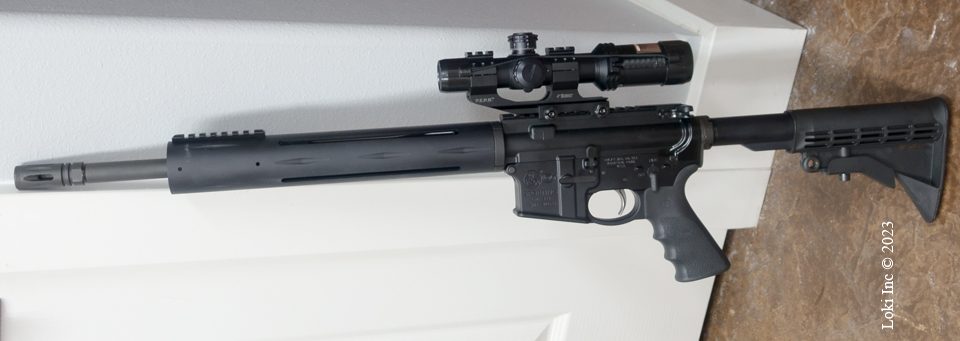
Rifle with Blackbeard X upper unit installed
Open the upper receiver, remove the charging handle and BCG, insert the BlackbeardX replacement, close the upper receiver back to its position on the lower receiver and pin it.
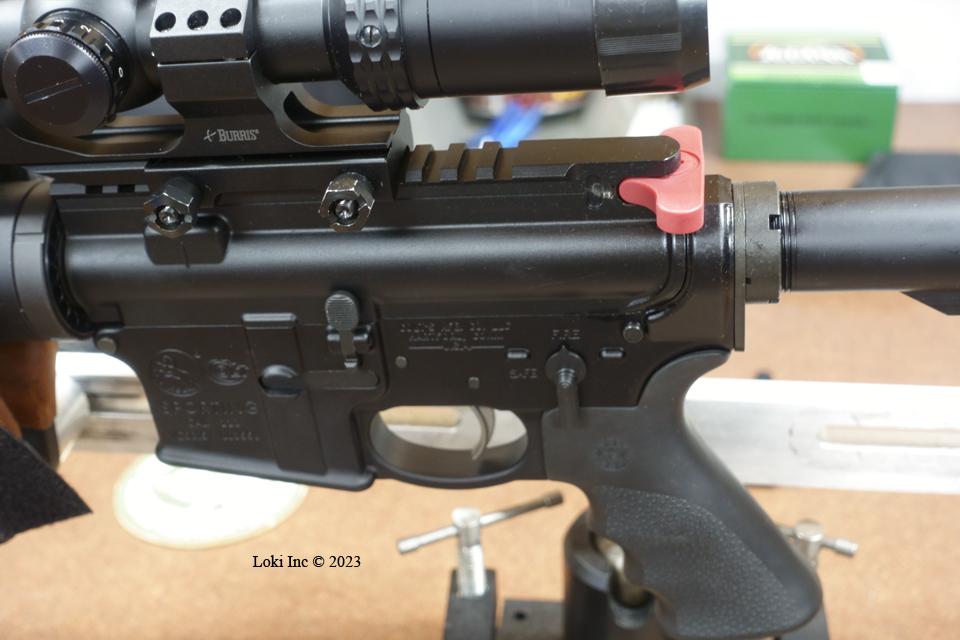
Left side view of rifle with Blackbeard X upper unit installed
When the battery pack is charged, simply insert the BlackbeardX magazine into the magazine well of the gun; make sure it is firmly seated. Before using the system, install the free Mantis smartphone application on your mobile device and get ready to pair your device with the BlackbeardX.
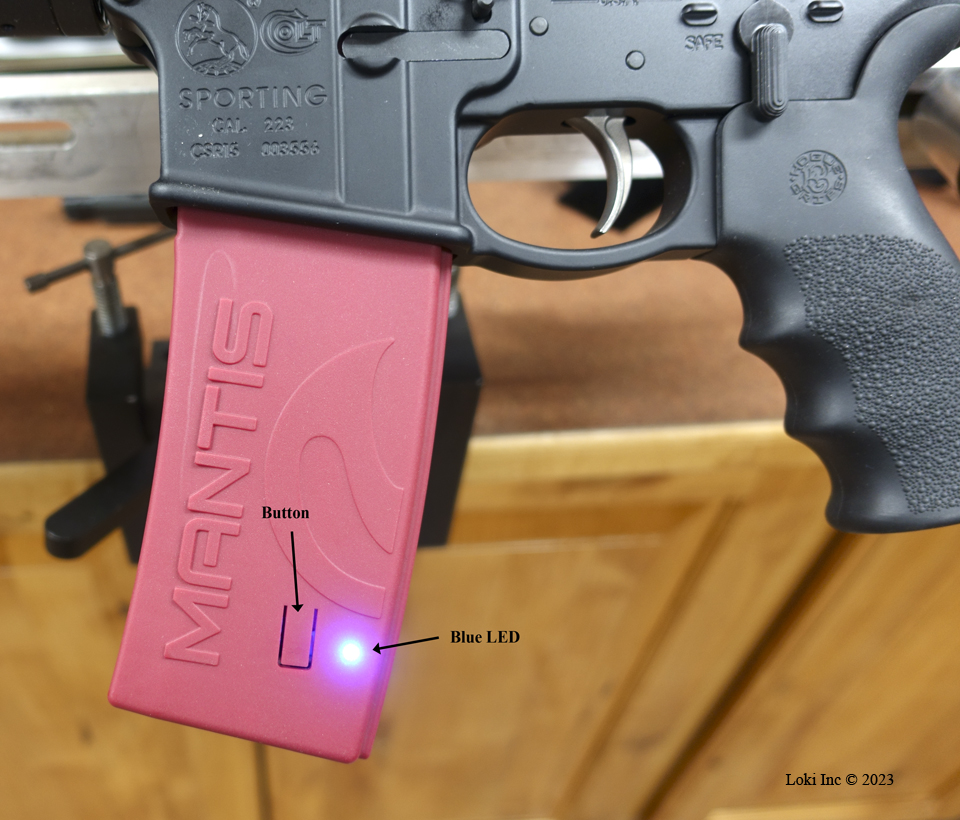
Side view of Blackbeard X magazine installed, showing power button and blue LED for Bluetooth
Fire!
When you are ready to use the system, press the power button on the lower left side of the magazine to turn-on the BlackbeardX. Be sure the LED on the side of the magazine near the power button turns-on. At that point, you can Bluetooth pair the Blackbeard X with your mobile device. Once your device and the BlackbeardX are paired, you are ready to use the system.
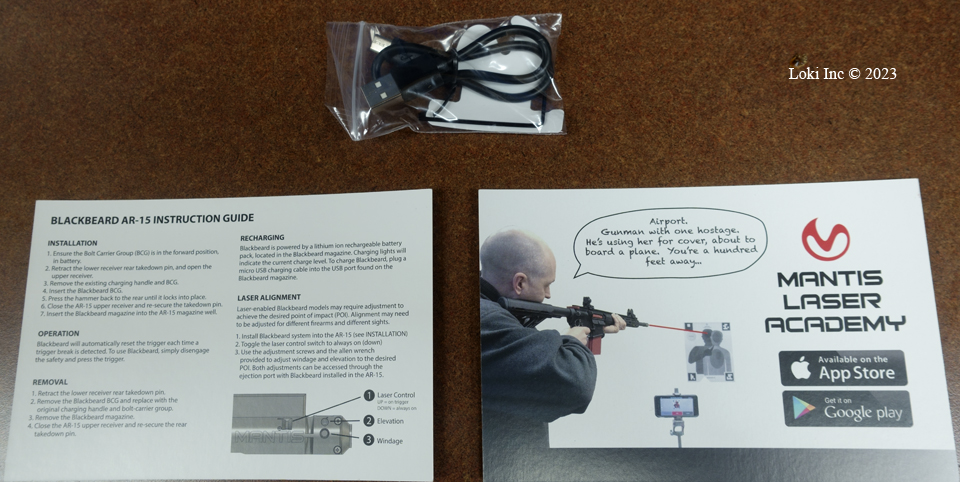
Blackbeard X instructions, cable, laser academy information
To recap a bit of my earlier review, once you upload the Mantis X application and create the Bluetooth connection to the Mantis system (BlackbeardX or X10 Elite) installed in/on your firearm, you can access many different scoring and training programs on the app. The Mantis sensors precisely detect movements of the gun and track those motions for a very brief time, as you pull the trigger until it breaks. As the tracking takes place, the gun unit transmits that information to the app. This allows the app to integrate gun pointing and gun movement into information in its sub-applications.
In my review of the X10 Elite, I addressed the advantages of including dry-fire in your training regime. Saving ammo costs is really a minor part of it, believe it or not. The real advantages are the ways the MantisX system makes dry fire training much more useful and effective.
If you are serious about improving your AR marksmanship skills, be sure to add effective dry fire to your training workouts, and be sure to add the BlackbeardX to your AR system!
Learn more about the Mantis BlackbeardX. MSRP: $319
Review: Mantis X10 Elite
The Mantis X10 Elite combines the utility of each Mantis X model into a single system, and the X10 Elite works with pistols, shotguns, rifles, and bows. It uses the same Mantis X application (updated from the original as per most apps) as the original system. The X10 Elite incorporates a simplified method of attachment to the firearm versus the original Mantis X that I have, and it is smaller and lighter than the Mantis X. It appears to have increased sensitivity, as it didn’t drop any of my dry fire shots as the original device did every once in a while. I found it an excellent aid for dry firing in particular.
Wow! It figures – for whatever reason, rising crime, Sleepy Joe, etc., a lot of us in the US have been buying guns recently. Moreover, for whatever reason, the ammunition to go along with those guns is scarce and expensive. What is a shooter to do? The conventional wisdom is to dry-fire your guns, even every day — particularly the guns that you may depend on to defend yourself or your family. Dry firing requires no ammunition (in fact, one must dry fire with no ammo in the gun or anywhere nearby), and it can be done in a safe area in your home, garage, shop, etc.
Unfortunately, unless you had some basic gun handling and marksmanship training, dry firing practice with a handgun is nearly useless. In fact, it may be harmful to your shooting skills.
Why? Unless you are very self-aware and are trained to use the correct sight alignment, grip, and trigger control, and can make a mental sight picture of where your gun is pointed and how the sights are aligned at the instant the trigger “breaks,” you do not have the skill necessary to self-criticize and correct problems with the aforementioned shooting skills. Without some way of telling, you are forming muscle memory habits that may become bad habits, making your dry-fire drills a waste of time or worse. The Mantis X10 Elite system is an aid to learning proper grip and trigger management.
How do I know? More than 40 years ago, I was a member of the US Air Force Academy Intercollegiate Pistol Team. As a teen living in a rural area, I learned gun safety from my dad, and he taught me basic marksmanship with a rifle and a shotgun. He admitted to having no pistol skills, so until I joined the team as a cadet, I had no training with handguns. Fortunately, our team coach was a pistol competitor in the Olympics and in the National Matches, and was an excellent teacher. I learned the above-mentioned skills from him, and they have since held me in good stead as the Officer-in-Charge of an RAF station shooting team, and as an NRA Certified Pistol Instructor.
Even though I already had these skills, I found the new Mantis system an effective aid to reinforce them, and a boon to dry fire practice.
In the long-ago and faraway times (so it seems) prior to the Covid uproar, I attended Shot Show. During my perusal of the multitude of booths and displays, I stopped at the Mantis booth and listened to their explanation of the shooting trainer device they called the Mantis X. I listened to the booth person’s explanation of the system, tried it on one of the neutered pistols they had at the booth, and decided to get one to use at home and on my range. The Mantis X system came with the rail-mounted sensor, a USB charging cable, Bluetooth connectivity, and a hard shell (Pelican-type) carry case. The sensor attached to a pistol rail with a screw clamp, and to holster the weapon I had either to remove the device or use a holster designed for a handgun with a light in the same mounted position as the Mantis X.
After that, I used a Mantis X off and on for several years, for personal training and for firearms testing, but I’ve found the Mantis X10 Elite is a definite upgrade to the older system. The X had problems tracking dry fire practice on some of my pistols, but so far, the X10 Elite system has not. The new system made my dry fire practice more useful and enjoyable, because I now had external feedback on my grip and trigger manipulation during the firing sequence. That’s one of the difficulties of dry firing without a coach or something like the Mantis system; with no feedback, if we aren’t already trained to recognize problems we will just keep clicking the trigger merrily away, possibly forming bad muscle memory habits. If we are trained already, we can lie to ourselves and accept poor gun handling as good follow-on training. The Mantis system helps prevent both situations.
So, what does the Mantis X10 Elite do? It precisely senses movements of the gun on which it is mounted, and captures those movements for a brief time as you move the trigger until it breaks. The gun-mounted sensor sends that information to the Mantis X application on your mobile device via Bluetooth, where the app massages the data to display gun pointing, gun movement and recoil information in the sub-applications. Pictures are worth many words, so I took some screenshots of a couple of my practice sessions, dry fire and live fire.
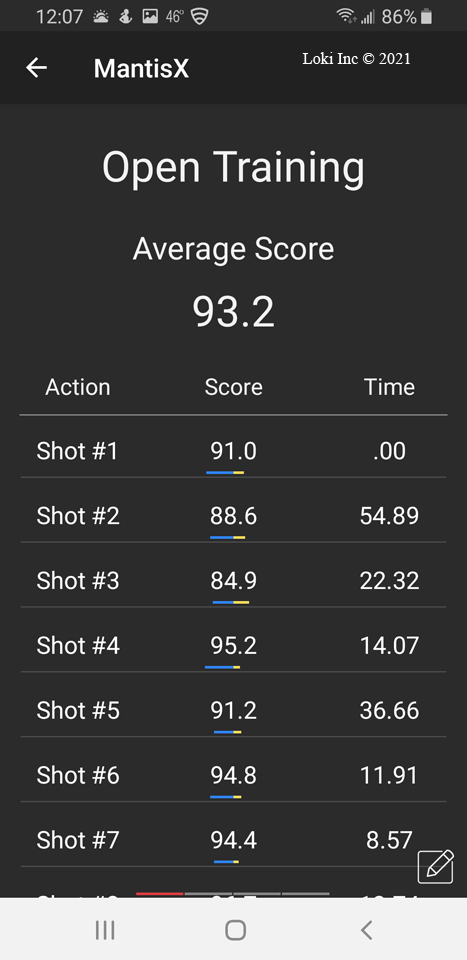
Mantis X application Open Training shot averages
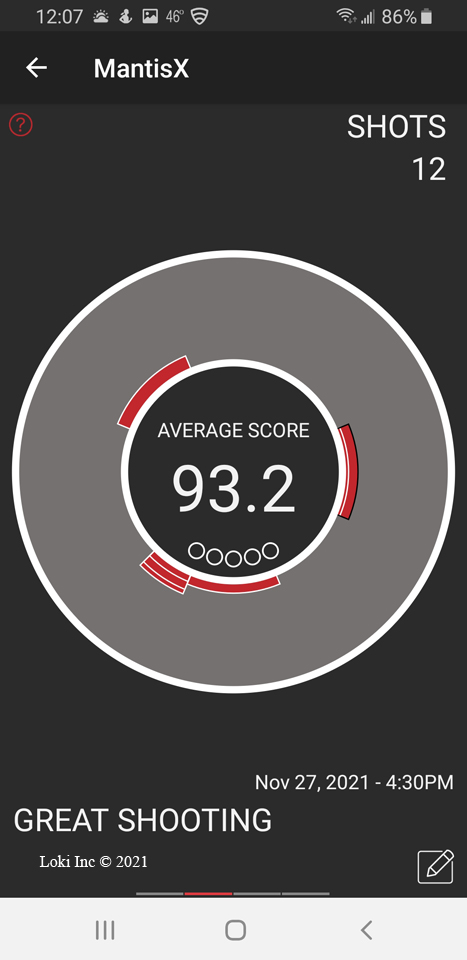
Mantis X application Open Training movement display
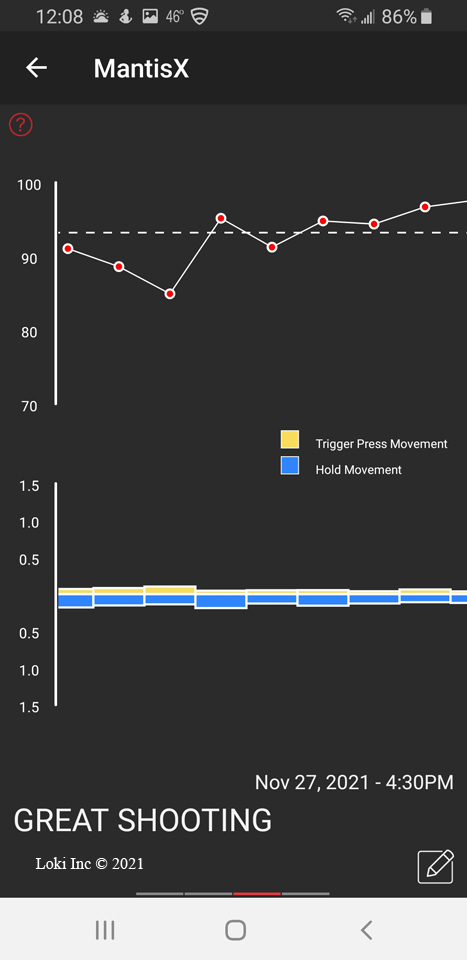
Mantis X application Open Training graphs
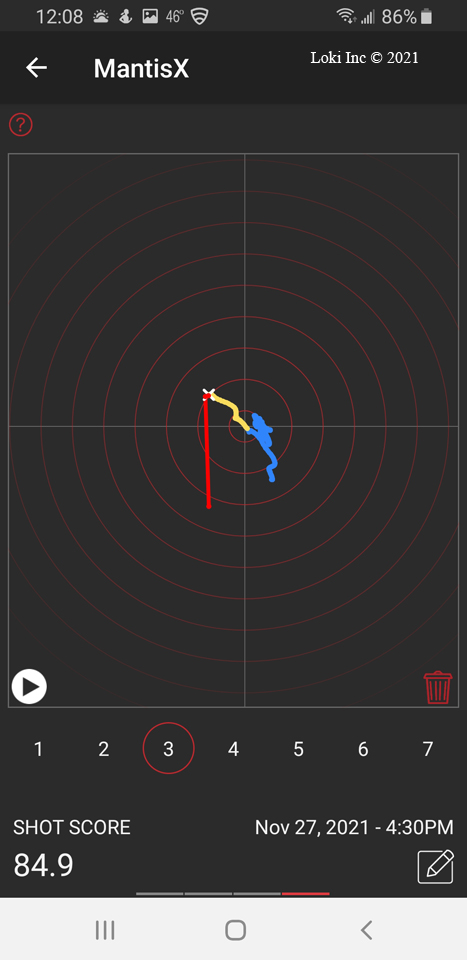
Mantis X application Open Training spiderweb chart
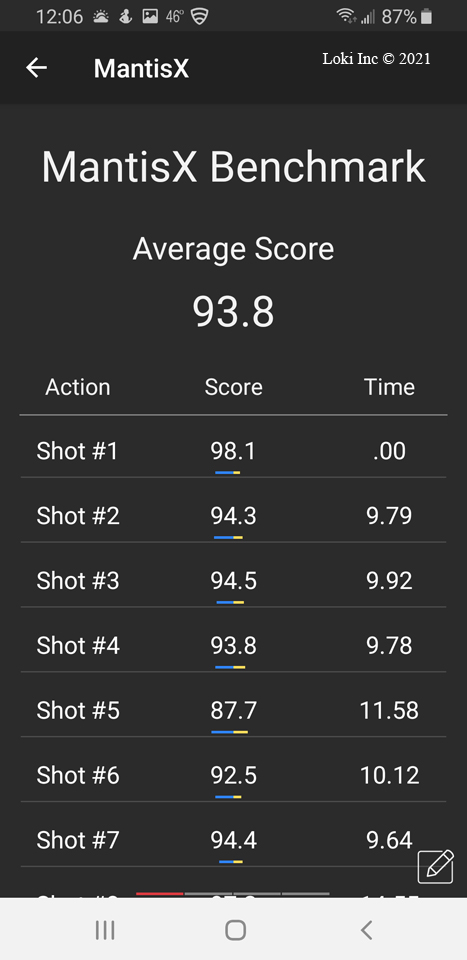
Mantis X application Benchmark shot averages

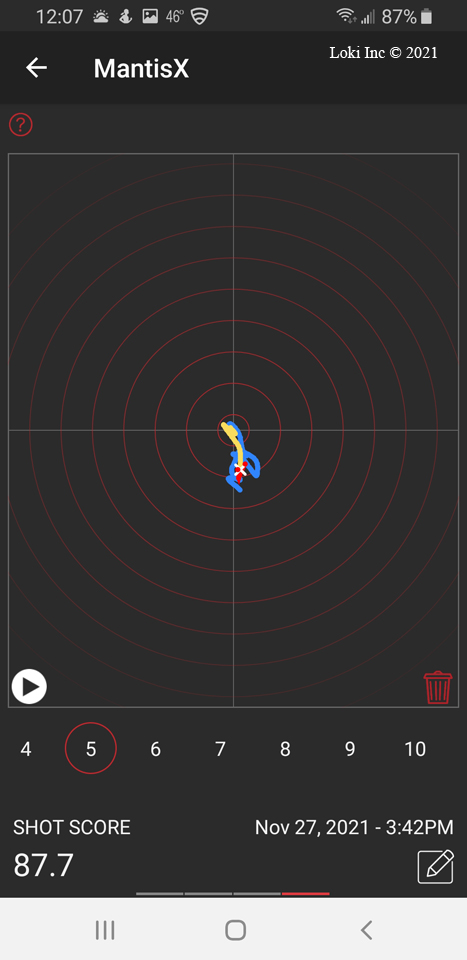
Mantis X application Benchmark movement display
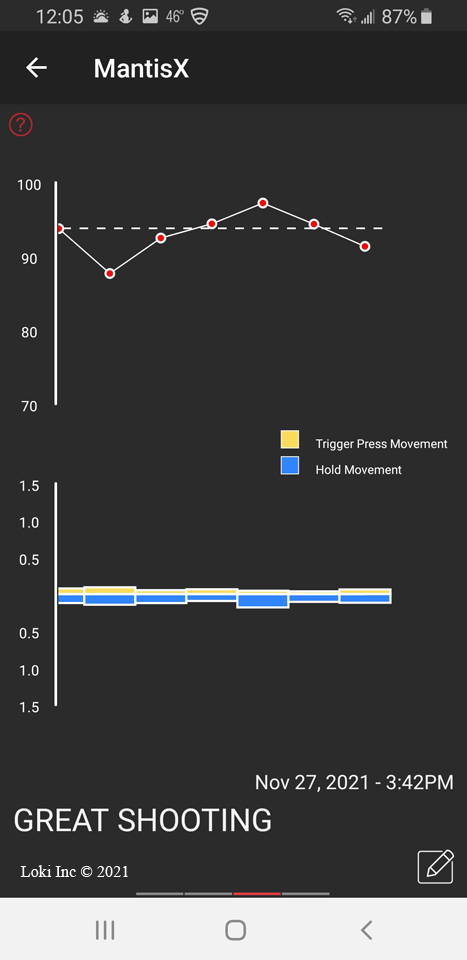
Mantis X application Benchmark graphs
Mantis X application Benchmark spiderweb chart
The application also presents several drills and courses that you can use as guides to your practice, including an introduction to the Mantis system that helps you learn to use the application.
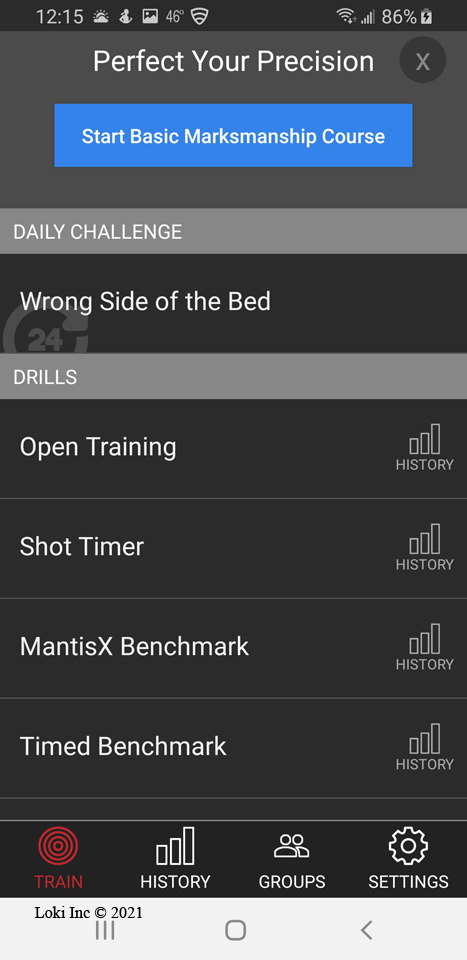
Mantis X training application page 1
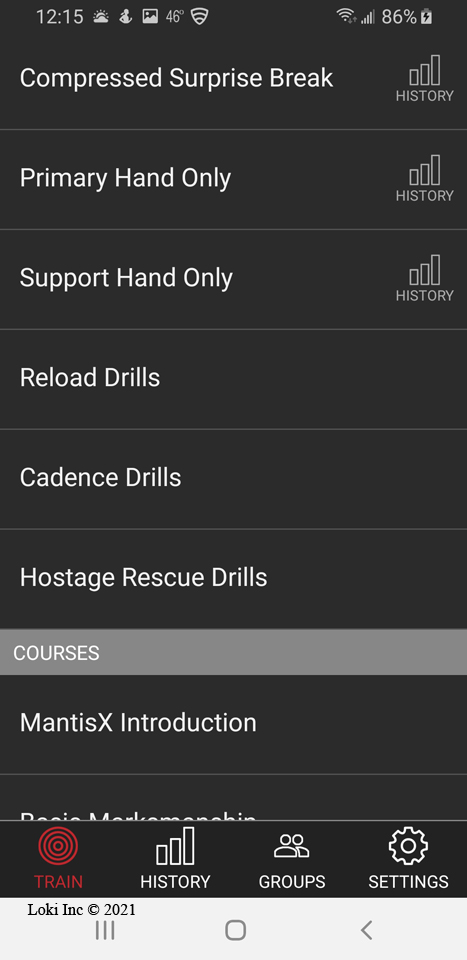
Mantis X training application page 2
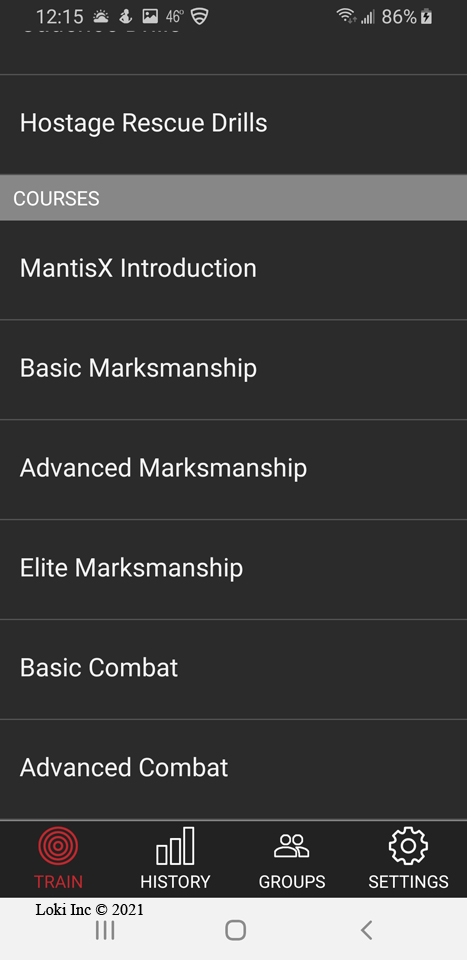
Mantis X training application page 3
Of course, the first time you use the application on your mobile device, you have to set it up. The setup, however, is simple and only takes a minute or two.
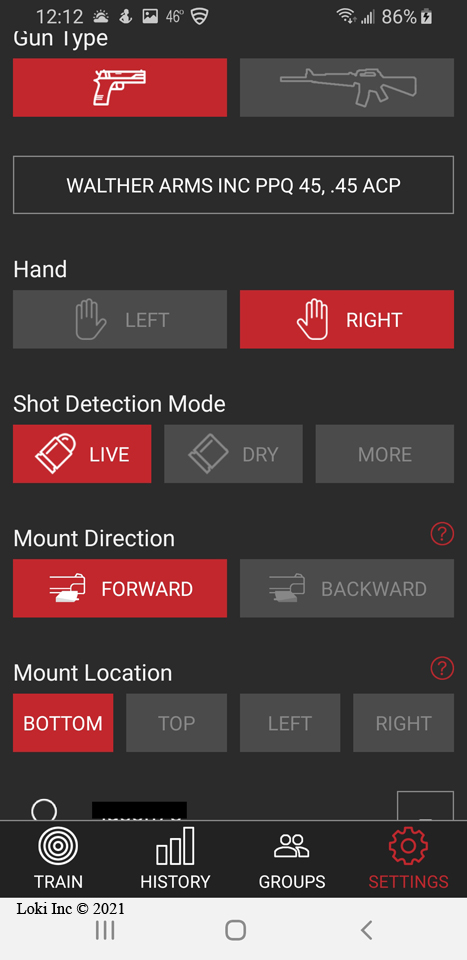
Mantis X application setup page 1
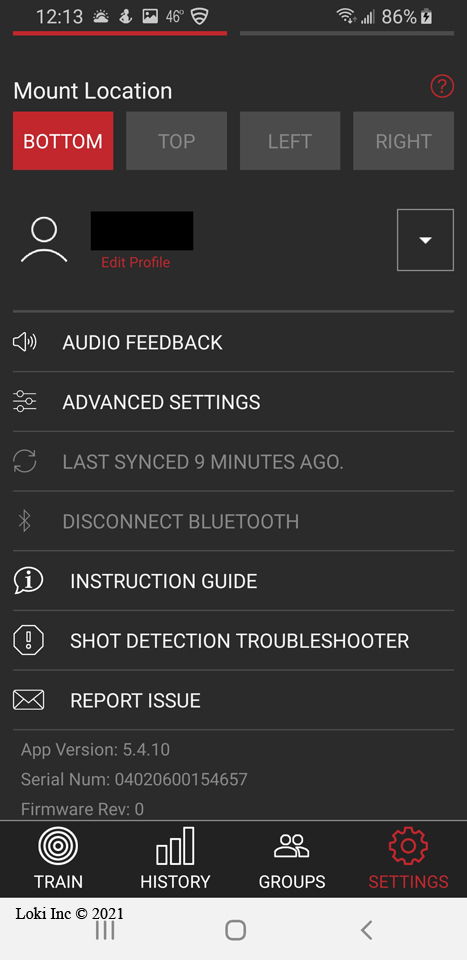
Mantis X application setup page 2
The instructions are located entirely within the application’s setup pages, and there are many videos on YouTube that might prove helpful if you have difficulties using the system.
I took a couple of photos showing a side-by-side comparison of the old Mantis X device versus the new Mantis X10 Elite system.
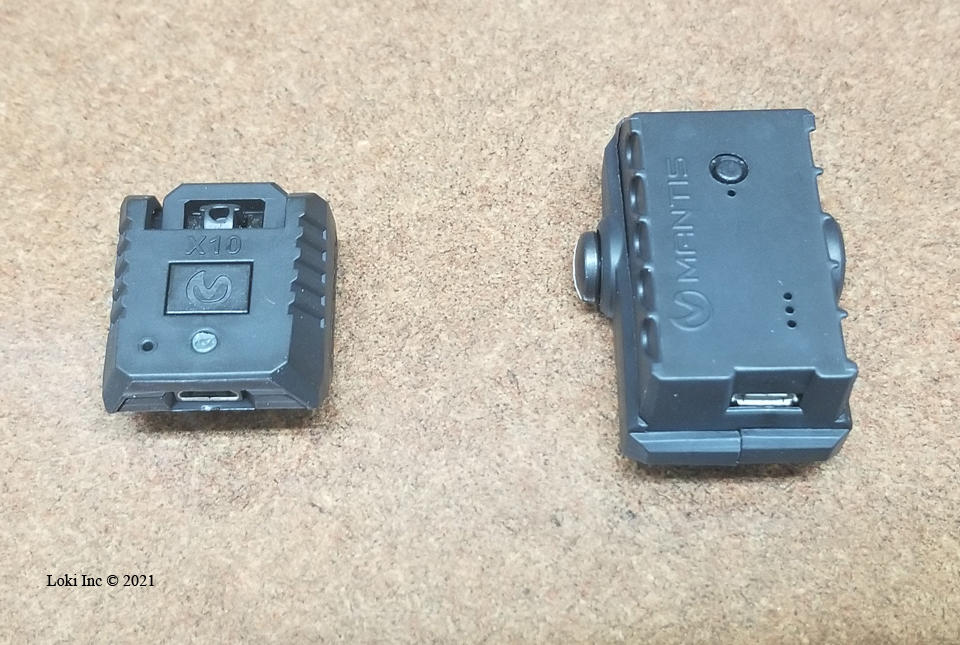
Mantis X10 (l) and Mantis (r) side-by-side comparison
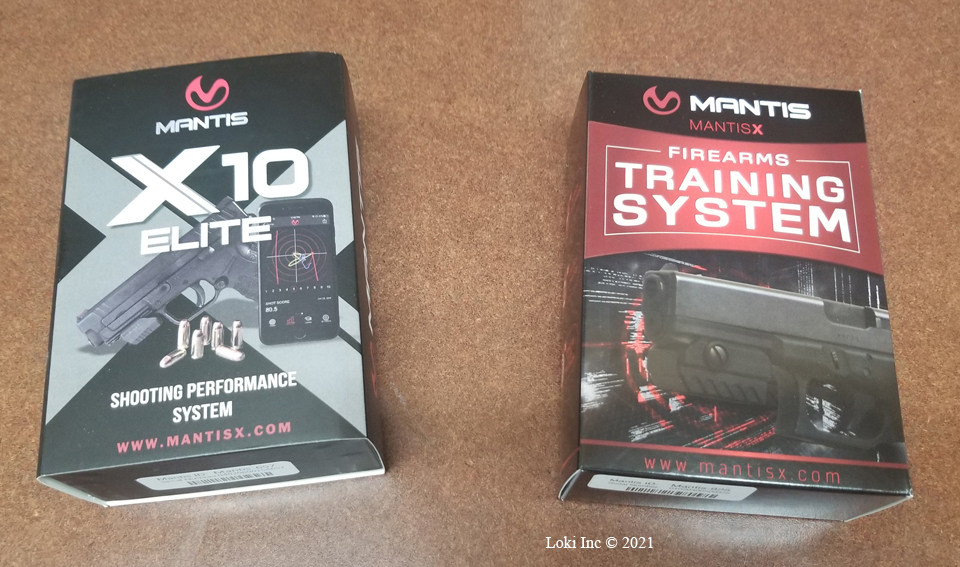
Mantis X10 and Mantis packages
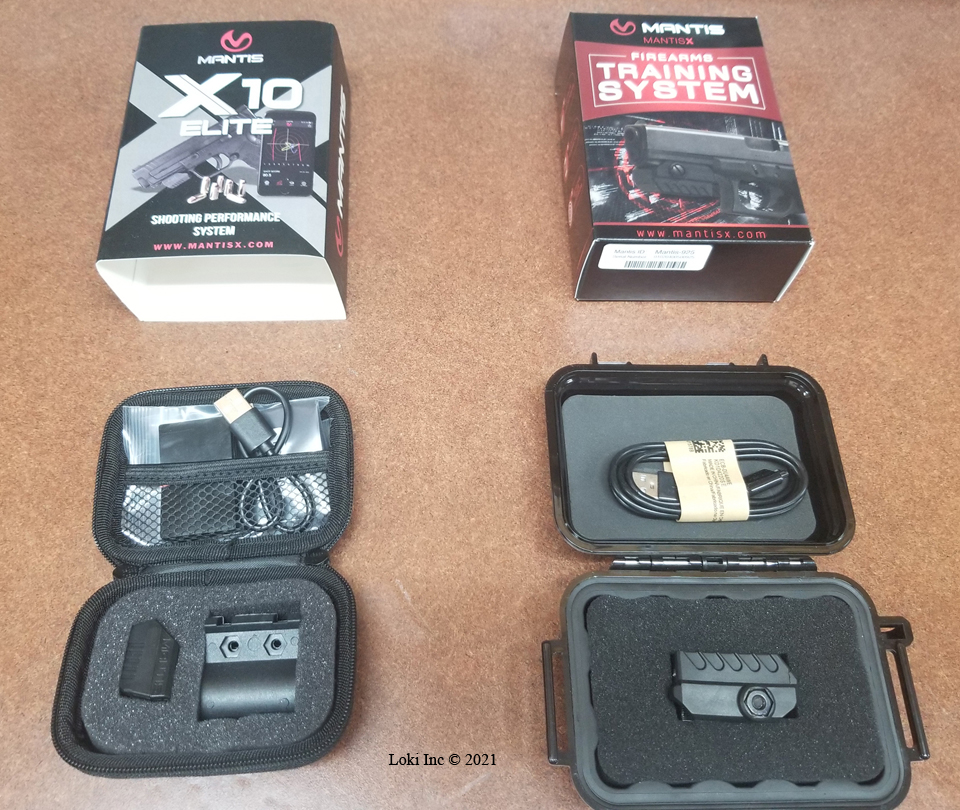
Mantis X10 and Mantis in their packages
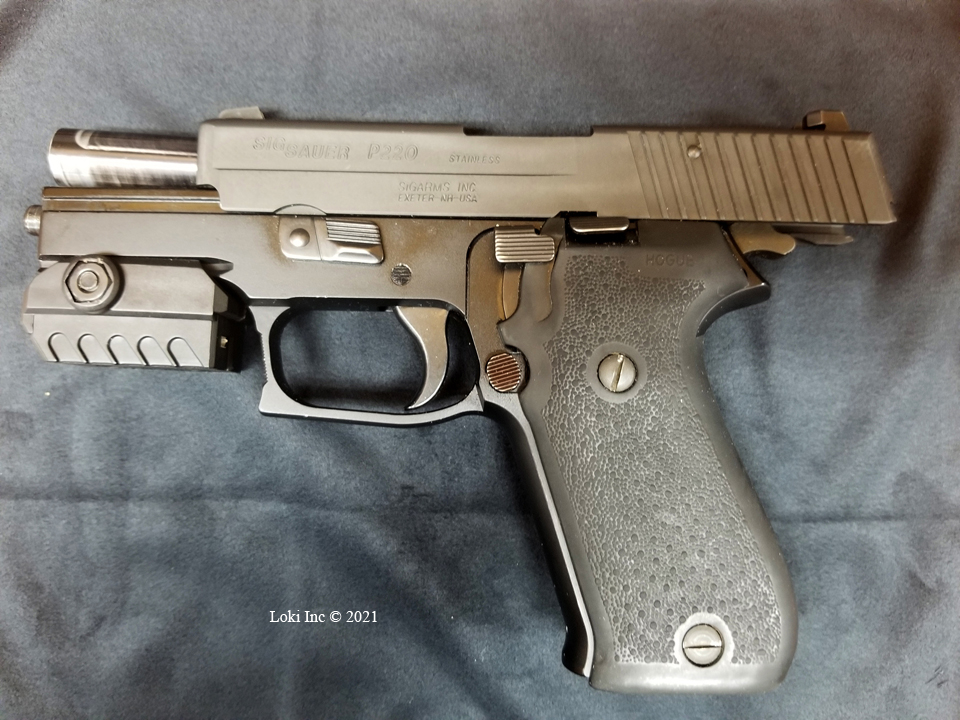
Good things definitely come in small packages! I also took a couple of photos showing the original Mantis and the X10 device attached to the dust cover rail on one of my pistols, a SIG P220.
Left side of SIG P220 with Mantis
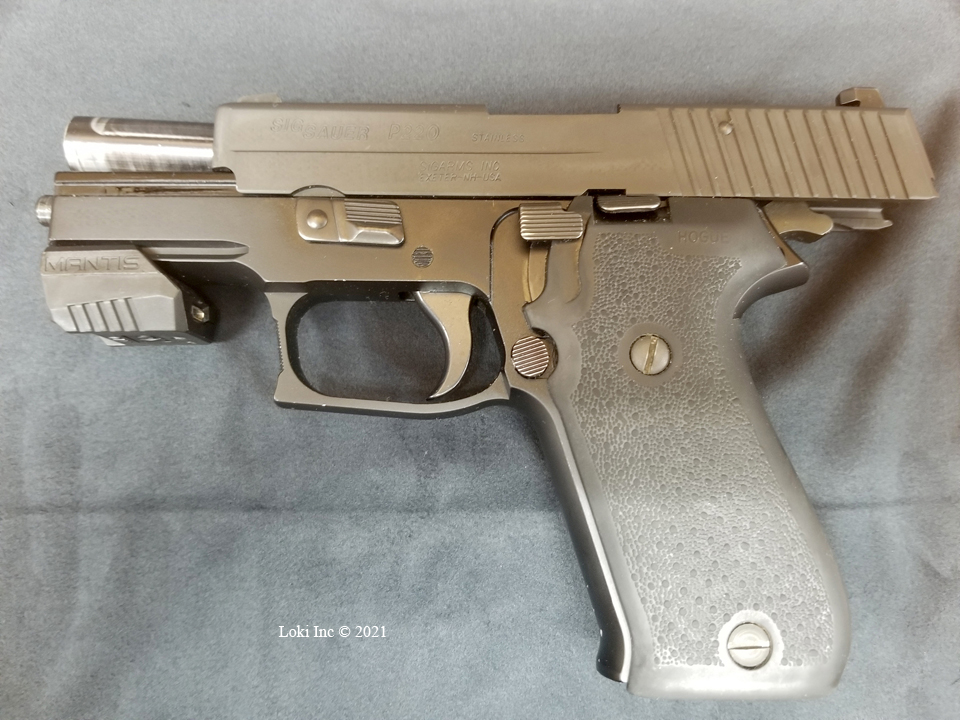
SIG P220 left side with Mantis X10
The Mantis X10 Elite system came with the sensor, a clamp and hardware useful for creating a mounting surface on a round part of a firearm, a USB cable, and a short section of Picatinny rail with attachment hardware.
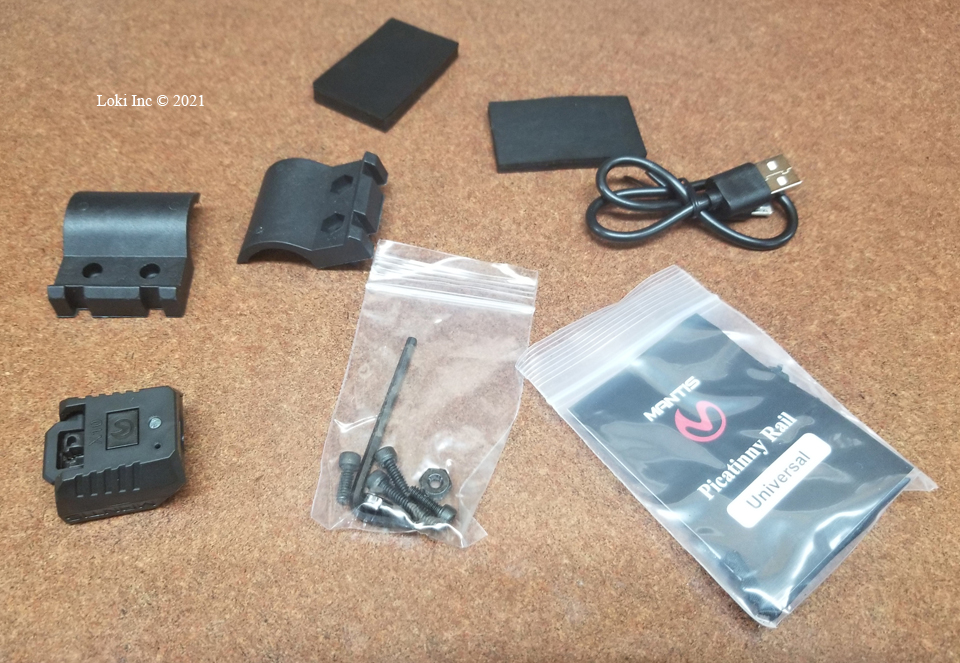
Included in the Mantis X10 package: Mantis X10, Picatinny Rail adapter and associated parts, USB cable
If your firearm already has a short rail section available in a good spot on the gun, you can attach the sensor directly to that rail section by merely pulling a spring-loaded lock out of the way while you slide the sensor onto the rail. Then, release the lock to secure the sensor in place.
So, if you want a great way to improve your dry fire practice during this dry spell of ammo availability, or if you have access to training ammunition, and you want a “coach” to give you grip and trigger manipulation feedback during live fire training, get a Mantis X10 Elite. Watch your shooting skills improve, even though Sleepy Joe would prefer you let them slide!